
Violin finger charts are a quick, visual way for beginner violinists to understand the geography of the violin fingerboard. Simple diagrams to show finger placing can also help in early note reading.
Tutor books such as C. Paul Herfurth’s A Tune A Day traditionally combine finger charts with music theory and note-reading exercises to help build a clear understanding of how the position of each finger on the violin strings relates to the notes on the stave.
Violin finger charts generally show the position of every finger in one position on the violin string. Most are limited to first position, as once first position is mastered, it is easier to understand new positions without such visual help.
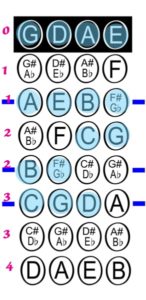
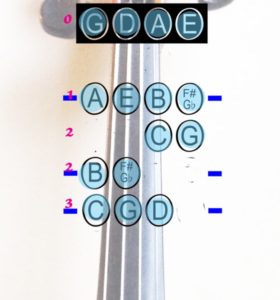
Here is an example of a basic violin finger chart showing the notes in first position. The letters marked by the black banner at the top of the chart indicate the open strings, G, D, A and E.
The blue markings at the side of the chart show the positions where, if you have stickers on your violin, the stickers are normally placed. This chart shows every single note in first position, making up a chromatic sequence of semitones.

This very basic violin finger chart simply shows all of the pitches that are available in first position. Each pitch name represents a semitone. The first two notes on the G string, G#/Ab and A can both be played with the first finger.
A#/Bb and B can be played with the second finger, C and C#/Db, the third finger, and D on the G string would be played with the 4th finger. However, this is not set in stone. In certain passages, a C# in first position might be played with a 4th finger, or an A# with a first finger. There are numerous options depending on the context.
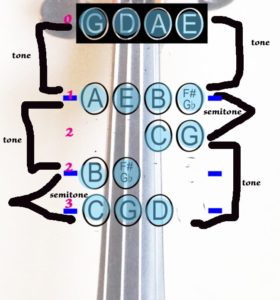
Now look at the chart again. This time it has been edited to show the notes of the G major scale. For clarity, the fingers have been added at the side of the chart. Every note highlighted in blue is played as part of the G major scale, and it is easy to see that the scale falls into two distinct finger patterns or shapes.
On the lower two strings, the 1st and 2nd fingers are a tone (whole note) apart and the third finger is spaced only a semitone (half note) from the 2nd. On the top strings this pattern reverses, with a low 2nd finger.
Violin finger charts are a useful way to begin learning scales. They show the patterns of tones and semitones in each key, and prepare the brain for the hand shapes within that key.
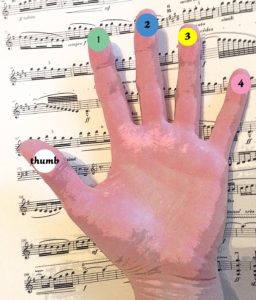
Each finger is given a number. This is universal to all teaching methods. The index finger is called 1, the middle finger is called 2, the third finger, 3, and the little finger is called 4. Unlike the piano, the thumb does not have a number, because the left hand thumb does not contact the strings.
Look at the picture below. Each finger is marked with the correct number:
Now imagine the finger chart is actually a diagram of the fingerboard of your violin:
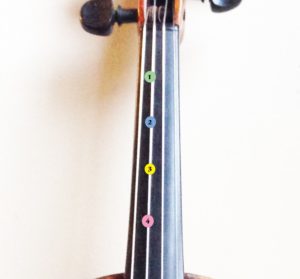
Where would the coloured dots and numbers fall to give the correct notes for G major?
Now let’s look at the original chart again, but this time, placed over the violin fingerboard:
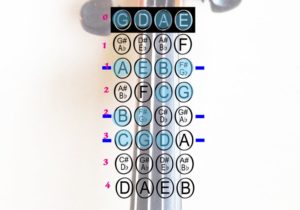
All the fingering chart is, is a diagram of the pitches in first position.
This diagram shows the pitches and hand shapes for G major highlighted in blue. The image below shows only the notes of G major. Using these templates, it is easy to create your own fingering charts for scale practice.
Violin finger charts are a helpful way to build a visual and physical memory of finger placings. Use them to learn scales and to get to grips with the pitches on each string. Then have a look at the way the notes are written on the stave.
The musical stave is just another diagram, a depiction of the different sounds you will make. These notes, when played on the violin in first position, all use the fingers on the D string. As they climb the stave from line to space, progressive finger numbers are used to raise the pitch of the note. These notes are called E, F, G and A:
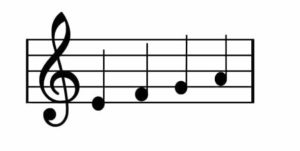
They are played using these fingers:
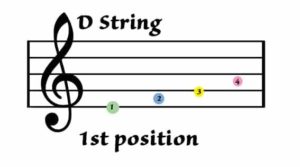
Notice how the notes on the stave relate to the finger numbers and to the positioning on the fingerboard of the violin.
As you progress on the violin it will be less practical to devise finger charts, but for beginners they are a great way to understand finger placing and to begin note reading.
For advanced violinists too, a mental image of a finger chart can be useful. If you encounter a left-hand problem, imagining the sequence of tones and semitones can help to solve the issue.
There are many free charts available online, but why not create your own? In drawing your own charts you will develop a clear understanding of finger position, where there are spaces and which notes are close together, and a much better knowledge of your scales and keys!
Please visit our sponsors:
London String School - Tuition for Adult Learners in London
MusicLand - Creative Music Products for Teachers and Learners
Please visit our sponsors:
FiddlerShop.com - Quality instruments at an affordable price
London String School - Tuition for Adult Learners in London
MusicLand - Creative Music Products for Teachers and Learners

