When you first start learning the violin, you will also start learning to read music.
To a musician, written music is like an actor’s script. It tells you what to play, when to play it and how to play it.
Music, like language, is written with symbols which represent sounds; from the most basic notation which shows the pitch, duration and timing of each note, to more detailed and subtle instructions showing expression, tone quality or timbre, and sometimes even special effects.
What you see on the page is a sort of drawing of what you will hear.
The notes in Western music are given the names of the first seven letters of the alphabet: A, B, C, D, E, F and G. Once you get to G the note names begin again at A.
The notes of the violin strings without any fingers pressed down, which are commonly known as the open strings, are called G, D, A and E, with G being the lowest, fattest string and E the highest sounding, finest string.
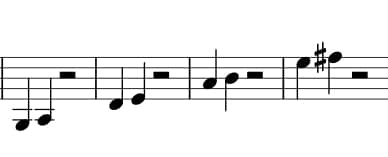
When notated, the open string sounds of the violin look like this:

You will see that the notes are placed in various positions on five parallel lines called a stave. Every line and space on the stave represents a different pitch, the higher the note, the higher the pitch.
The note on the left here is the G - string note, which is the lowest note on the violin. The note on the right is the E - string pitch, which is much higher.
The round part, or head of the note shows the pitch by its placing on the stave. Each note also has a stem that can go either up or down.
The symbol at the front of the stave is called a treble clef. The clef defines which pitches will be played and shows if it’s a low or high instrument.
Violin music is always written in treble clef. When notes fall outside of the pitches that fit onto the stave, small lines called ledger lines are added above or below to place the notes, as you can see with the low G - string pitch which sits below two ledger lines.
Once too many ledger lines are needed and the music becomes visually confusing, it’s time to switch to a new clef, such as bass clef.
The numbers after the treble clef are called the time signature. The stave works both up and down (pitch) and from left to right.
From left to right, the stave shows the beat and the rhythm. The beat is the heartbeat or pulse of the music. It doesn’t change.
The music is written in small sections called bars, which fall between the vertical lines on the stave called bar lines.
Some pieces have four beats in a bar, which means you feel them in four time, some have three, like a waltz, and so on.
The time signature shows how many beats are in each bar, and what kind of note each of those beats is.
The rhythm is where notes have different durations within the structure of the bar. This is where pieces can really start to get interesting.
Here we can see a variety of rhythms.
 Each of these bars has a value of four beats. The first of the notes above is called a semibreve. It lasts for four beats.
The second is called a minim (or half note, in America) and each minim lasts for two beats. You can see there are two minims in a four-beat bar.
The third example is a crotchet or quarter note. Each crotchet is one beat long.
The fourth rhythm is a quaver, or eighth note, which lasts for half a beat, and the last note value shown is called a semiquaver or sixteenth note, and lasts for quarter of a beat, so sixteen semiquavers fit into a four beat bar.
The smaller notes are written in groups of four so they match up with the beat visually and are easy to read. Each note length has a corresponding symbol to show when there is a rest (silence) of that duration.
The time signature 4/4 shows that there are four beats in each bar (the top 4) and that each of those is a crotchet or quarter note (the lower 4).
The time signature 3/8 would show three (the top number) quaver, or eighth note, (the bottom number) beats in a bar.
As you put your fingers on the strings to play new notes on the violin, the music shows the pitch rising. So the first finger note on each string of the violin would look like this: The note after G on the G – string is called A and is played with the first finger.
The note after D on the D – string is called E, on the A – string it’s B and on the E – string it’s F.
The first finger in violin fingering is the index finger, unlike on the piano where 1 denotes the thumb.
There are other symbols which show pitch, one of which, the thing that looks like a hash tag, is shown above. This one is called a sharp and the full name of the second note shown on the E – string is F sharp.
You will see these symbols for sharps or flats in the key signature of nearly every piece. The key signature is placed between the treble clef and the time signature and shows you which key or tonality to play in.
As you add the other fingers, you can see below how the gaps on the stave are filled, until you are playing every first position note on your violin. As you build up your fingers one at a time, the pitches on the stave look like this:
The very last note here is played with the fourth finger on the E – string.
It is worth noting at this point that because the pitches of the violin strings are five notes or a fifth apart, each open string note after G can also be played with the fourth finger or pinkie on the previous string, so the A – string note, for example, can be played with the fourth finger on the D –string.
This seems a lot to remember but there are a couple of helpful memory tricks:
The notes in the spaces of the stave, in ascending order, are F, A, C and E, or FACE.
The notes on the lines are E, G, B, D and F. You may remember learning the mnemonic, Every Good Boy Deserves Fun.
You will soon begin to memorise which note corresponds to which sound and finger placement on your violin. Remember that when you learned to read, you were simultaneously studying writing skills.
Try downloading and printing this music manuscript paper, and practice writing out the notes as you learn to play them. Write out the open string notes and practice from your own copy.
Making the connection between writing, reading and playing will speed up and deepen the process of learning.
Soon the note reading will become habitual, and just as you don’t have to process every letter to read a word, you will begin to see the piece as a whole rather than having to read each note and work out where to play it.
As with any new skill, the more you practise and try it out, the more confident you will feel and the sooner you will be reading music fluently.
Please visit our sponsors:
London String School - Tuition for Adult Learners in London
MusicLand - Creative Music Products for Teachers and Learners
Please visit our sponsors:
FiddlerShop.com - Quality instruments at an affordable price
London String School - Tuition for Adult Learners in London
MusicLand - Creative Music Products for Teachers and Learners
