
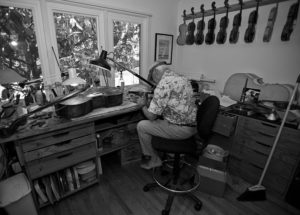
If you're a practically minded violinist, the idea of learning to maintain and repair your own instrument can be an interesting diversion. Those interested in cars who buy a vintage classic model would naturally learn how to improve the engine and fix things up when repairs are needed.
Surely, just like the keen motor mechanic, in order to feel properly invested in your violin playing, you must own a full set of violin repair tools and be able to carry out your own repairs?
No.
Violin repair tools are available quite cheaply online. The violin is made of wood. Perhaps buying wood glue and a set of clamps would be sensible?
No.
The violin is an extremely delicate instrument, both physically and scientifically. The way it is put together in order to work is extremely sp
ecific. String teachers speak with horror and humour combined of students arriving to their lesson with the bridge glued on the instrument because a helpful parent with some DIY skills had noticed it had a tendency to fall off. Any violinist knows that the bridge is fixed to the body of the instrument by the tension of the strings, but to a lay-person this must seem like madness.
Violin maintenance at home involves some very simple violin repair tools. You will already have some of the items that will help keep your instrument playing well. Some are regular household items. You may also have some DIY-type tools that it is tempting to use, but which should never go anywhere near your violin.
Leave them in the garage.
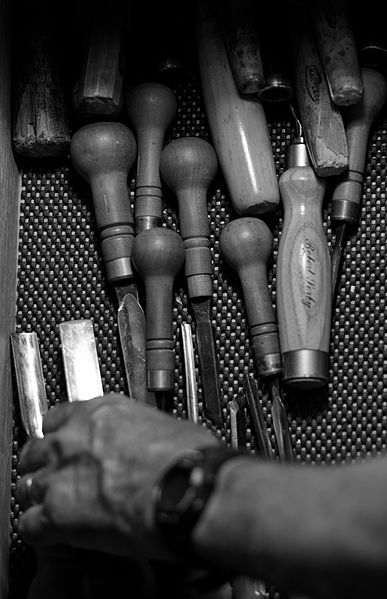 Simple Violin Repair Tools
A small screwdriver or chinrest pin
Replacing or tightening a loose chinrest is a simple repair. It is possible to fix the chinrest onto the violin using a mini-screwdriver. Ask in your violin shop before you attempt this for the first time. Be careful that the screwdriver does not poke through the adjustment holes in the chin-rest legs or you will scratch the varnish or even gouge the wood of your violin. Once you have been shown how to replace or tighten a chinrest, this is an easy repair that you can carry out yourself at home. Custom-made chinrest tools are available: If you buy a new chinrest it should come with a pin-type tool, or key tools such as this one are available. http://www.ebay.co.uk/itm/VIOLIN-CHIN-REST-CLAMP-KEY-TOOL-FOR-SAFELY-OPENING-TIGHTENING-CLAMP-UK-SELLER-/221592229815?hash=item3397ed17b7:g:YMQAAOSwrx5UVPCy
A duster
The simple lint-free duster or cloth is a valuable asset in your violin case. Use this to wipe excess rosin and sweat from your instrument after each time you play. Removing rosin dust from the varnish helps to keep it in good condition where a build-up can create a sticky, dirty surface that will deaden on the tone of the instrument.
Dry uncooked rice
A surprising amount of dust and fluff can and will collect inside your violin. This can have a negative effect on the sound. If the inside of your violin looks dirtier than the skirting board behind the sofa, a small amount of dry, uncooked rice will help. Gently pour some of the rice into the f-holes, and shift it around carefully. The rice will collect any dust and fluff fibres. You can then turn your violin upside down and let the rice fall out of the f-holes. Make sure you get every grain of rice out, and the key word is ‘gently’. Don’t fill your violin with rice and shake it around like some sort of primary-school percussion instrument.
Peg paste
Ask your violin repairer to supply you with some peg paste. This comes in two varieties; one stops your pegs from slipping, the other lubricates stiff pegs. There is no substitute for well-fitting pegs, but even these can slip or stick in extreme weather. Sometimes pegs can stick so badly it seems impossible to move them. In this case, do not apply any sort of force or use a tool to loosen the peg. You could snap the neck of your violin. Take the violin to a violin repairer to have the peg adjusted. Apply peg paste to your pegs to keep them turning well. This will also increase the life of your strings as each adjustment of pitch when tuning will be smoother and more gentle.
A soft pencil
When you fit a new string, it is a good idea to make some marks on the peg with a soft pencil, around 3B or 4B. You can also mark some pencil at the top nut where the strings join the fingerboard, and in the grooves of the bridge. This works to supply a smooth surface for the string to slide over and acts in the same way as peg paste to keep the pegs turning easily.
Small sharp scissors
Sometimes the bow hair breaks or snaps off whilst playing. Try to avoid pulling the loose ends out. This can result in more breakages or in the whole bunch of hair falling out of the bow. Use a pair of scissors such as nail scissors to trim the broken hairs back as closely as possible to the nut and tip.
Things you definitely never need…
Wood glue or superglue
Violins sometimes come unglued round the edges or develop cracks. So why can’t you repair this yourself using wood glue? Luthiers use a very specialist glue to make and repair violins. This ‘hoof and hide’ glue has just the right properties: It shrinks when it dries, pulling the instrument together and it is a weak glue. This is crucial. Not only does the weak glue allow the violin to be unglued at a later date if necessary, it guards the instrument against cracks as it will separate rather than force the wood to stay glued. Imagine you are in a very dry climate. The wood of your violin shrinks with the low humidity. Your violin is glued together with superglue. What will happen? The glue will remain tight and the wood will split as it shrinks.
The specialist glue needed for violin repairs is reconstituted from granules and has a very short shelf life. An experienced luthier will regularly make fresh glue. The luthier will also have the specialist clamps needed to keep your violin together until the glue has dried.
Never try to glue your violin yourself: It just isn’t worth it. Bad repairs will significantly reduce the value of an instrument and will cost more to put right in the long run.
A sound-post adjuster
Adjusting your own sound-post is tempting. You know that it can make the violin work better, so why not learn to do this yourself? Violin repairers report significant damage to instruments from players who think they can make their own sound-post adjustments. On one hand, anyone with basic motor skills and an Amazon account can purchase the tool and move the post, but the truth is, the knowledge behind how and where to move it is hugely complex, and in an instrument that has a curved belly, actually making the post fit is a different matter. You do not need a sound-post tool any more than you need to attempt your own dentistry.
DIY repair is not a prerequisite of violin playing, and is rarely or never attempted by most top professionals. Ask friends or your teacher to recommend a luthier who is able to help you get the most out of your violin and leave the repairs to the specialist. Most small repairs are relatively inexpensive and a good luthier will be happy to discuss options before undertaking the work.
Please visit our sponsors:
London String School - Tuition for Adult Learners in London
MusicLand - Creative Music Products for Teachers and Learners
Please visit our sponsors:
FiddlerShop.com - Quality instruments at an affordable price
London String School - Tuition for Adult Learners in London
MusicLand - Creative Music Products for Teachers and Learners
