
Learning the violin is a life journey. Whatever attracted you to start, whether it was a particular performance, the uniquely beautiful sound of the violin, a desire to learn a new skill or the fact you had always wanted to play an instrument, there’s a lot of fun ahead. For more advanced students too, as you deepen your relationship with the instrument and the repertoire, there is always more to learn.
Progress takes diligence and patience, but there are certain things you can do that will keep you on the right track. These ten violin-playing tips can be followed at every level of playing and will have a really positive impact on your experience of the violin. Treat yourself to an immersive, holistic learning journey. If you’re stuck, if your practice feels stagnant, or progress has ground to a halt, use these ten tips as a checklist for progress.
There are many low-cost student violin kits on the market, and some of them are really horrible! They sound bad, look cheap, and even the most experienced professional would find them hard to play. Shop around for the best instrument you can afford. Nobody expects you to turn up to your first lesson, or even your 101st lesson, with a Stradivarius, but you will learn better if the violin works well.
There are plenty of good student sets too, and an experienced luthier will be able to improve a low-cost instrument by refining the set-up. Ask your teacher’s advice before buying a violin and talk to your violin shop about fitting a good violin bridge. If you don’t want to commit straight away, many dealerships offer rental options while you look around for the right violin to buy.

The cost of violin lessons can seem high, but one-to-one time with an experienced tutor is invaluable. Your teacher will assess where you are in the learning process and which skills you need to work on. A skilled musician will direct your learning and identify problems before you develop bad habits. One-to-one lessons offer a great opportunity for development. Modern technology gives the opportunity to have wonderful learning experiences wherever you are in the world. Many students now have violin lessons over Skype with their teacher in a different city or even continent.
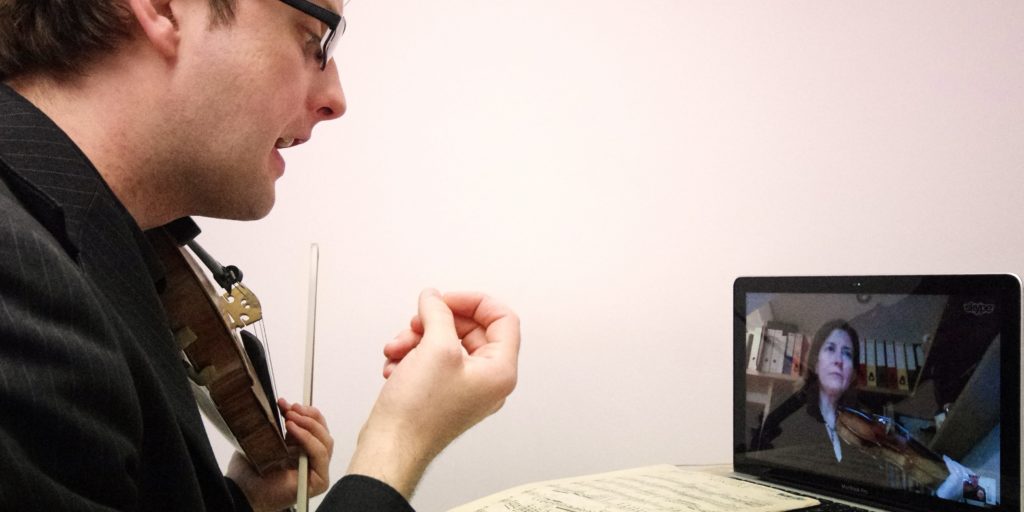
Nowadays, many learners take lessons via webcam using software such as Skype.
Daily practise WILL lead to progress. Yes, there’s the research that says it takes 10,000 hours to master a skill, but don’t feel you have to practise for hours every day to see improvement. Much more important is HOW you practise. Work undertaken with focused concentration pays off, but mindless repetition can actually set you back. Study in small time-blocks with lots of breaks, maintaining an awareness of your focus. Before repeating a task, identify where the problem is and what you are aiming to change.
It takes a lot of brainpower to play the violin, but ultimately you make the sound by moving your body. Do some simple warm-up stretches before practising and keep a spot check of your posture throughout the session. Notice any areas of tension, analyse what is causing them (I’m clenching my jaw because I am trying too hard; I’m raising my right shoulder because I’m worried I will drop the bow). If you can’t release the tension by yourself, ask your teacher’s advice. Many problems can be resolved by simply remembering to breathe and maintaining awareness.
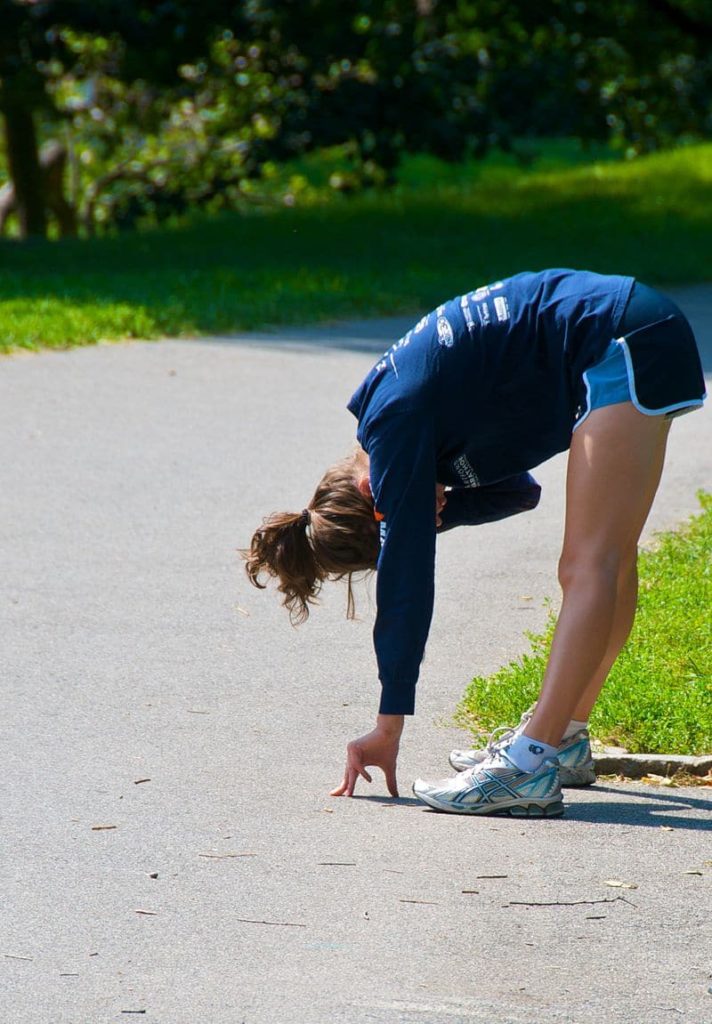
A flexible, well-balanced body posture is essential for good violin-playing.
When learning how to manage the violin physically, it is sometimes hard to concentrate on how you sound. And because the violin is placed so close to the left ear, it is not always easy to get a real sense of how the performance sounds to others. Record your practise as often as you can. Listen back, looking for positives as well as points you want to improve.
Whatever repertoire you are learning, it is really important to listen to the piece. By listening to other violinists, not only will you develop a well-rounded idea of your piece, you will develop your ear. Passive listening (listening away from your instrument) can improve pitch, tone and phrasing, while active listening (with the music in front of you and the violin or an air violin in your hand) can actually trigger physical improvements and musical insights. For example, miming your bowing along with a section of a recording can deepen your muscle memory of that bowing, and help identify problem areas. There are literally thousands of videos and recordings available on YouTube, featuring some of the greatest violinists who ever lived. Sometimes you can even get ideas for fingerings and bowings by watching your favourite soloist play!
Technical exercises and scales are the building blocks of violin music. Working on these simple patterns out of context of the repertoire gives an opportunity to improve intonation and tone production across the board. Scales also help teach an understanding of key. You’ll find loads of scales and technical exercises in our resource library.
All music, no matter how simple, comes with some historical and social context. Is your piece based on a dance or a song? Who was the composer, and when was it written. For more substantial pieces, it can be interesting to find out why the work was composed and what was going on in the composer’s life at the time. If someone had fallen in love or was suffering from depression, those feelings will be reflected in the music and might inform how you choose to express certain phrases.
A major reason we get nervous during performance is because it is an unfamiliar situation and therefore fraught with pressure. Practise performing, either by simulating performances where you play your piece without stopping to an armchair full of teddy bears or smart phone microphone, or set up performance opportunities with friends. Integrate the act of performing into your preparation and it will soon feel natural.
To give a good performance, you need to practise performing! Make performance practice part of your regular practice habits.
It is easy to panic and feel stressed if things are not going to plan. Whatever your age or playing level, a bad practise session can feel like a personal disaster. If your practise is really going badly, stop! Take a break, go for a short walk, try some breathing exercises or have a glass of water. Never pick up your violin expecting it to feel the same as it did yesterday, that would be like walking into a room and finding everyone in the exact same mood they were the day before.
Begin where you are today, with a sense of exploration. If something will not go right, break it down to open strings, practise some slow bows or go back to relaxed scales.
The circle of fifths is a musical theory tool that has its roots firmly in mathematics. It explores the relationships between those musical intervals that are most pleasing to the ear, based on discoveries made by the mathematician Pythagoras two and a half thousand years ago.
Pythagoras discovered and investigated the most basic facts about frequency and pitch. He found that there were mathematical ratios between notes. The octave, which is the most basic interval, the point at which pitches seem to duplicate, has a natural 2:1 ratio. If a string of a certain length is set in vibration it will produce a particular note. The shorter the string is, the more times it will vibrate per second, once it is set in vibration. When a string vibrates more times per second, the pitch of the note produced is higher. Therefore, if the string is kept at the same tension but its length is halved, it will produce a note one octave higher than the first. The same happens when you blow through a tube of air. A tube twice the length will produce a note an octave lower.
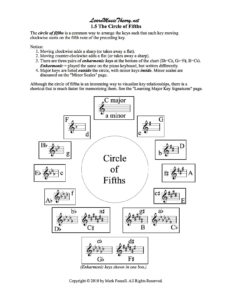
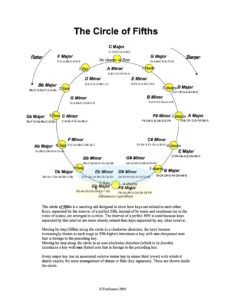
The circle of fifths, sometimes called the Pythagorean circle, is a diagram with twelve points that represent the twelve semitones within an octave. It is a chart rather like a clock face that organises all the keys into a system and can be used to relate them to one another. It is called a circle of fifths because each step of the circle is a perfect fifth from the next. The fifth is the interval that is closest in character to the octave, in that it is more consonant (less dissonant) or stable than any interval except the octave (or the unison).
A perfect interval is one where natural overtones occur. If you play a note on your violin and listen closely, you will hear the pitch you are playing. You will also hear overtones sounding. The most significant of these, or the easiest to hear, is usually the fifth. Where the ratio of frequencies between octaves is 2:1, the ratio of the frequencies of the fundamental to the fifth is 2:3. A perfect fifth is an interval of seven semitones. These seven semitones represent the building blocks from the first note of a scale to the fifth.
Watch this video for a clear description of how the circle of fifths is built.
The circle of fifths is useful because it shows the relationship between the keys, key signatures and chords.
It can be used to:
Now you’ve watched the video on how to make a circle of fifths, have a look at this interactive circle of fifths. You can use it to look at the relationships between chords in any key.
So what is the circle of fifths useful for?
It is possible to learn the order of sharps and flats as they occur in music by using the circle of fifths. You can work out how many sharps or flats are in a key, and also which notes are sharpened or flattened.
If you look clockwise around the circle you will see the order in which the sharps appear in the key signature. When there is one sharp, it is F#. When there are two, they are F# and C#. Three sharps will be F#, C# and G# and so on.
Looking round the circle in an anticlockwise direction shows the order of flats. If there is one flat it is Bb. Two flats are Bb and Eb. Three are always Bb, Eb and Ab, and so on.
In a circle of fifths in the major keys, C major appears at the top of the circle. C major has no sharps or flats. The next key in a clockwise direction is G major. G major has one sharp, which we now know is F#. Then comes D major which has F# and C#. Going in the other direction, F major has one flat, Bb. Bb major has two flats, Eb major has three flats.
Use the interactive circle of fifths above to notice the enharmonic changes this creates in flat keys between, for example F# and Gb. Look at the circle in D major and then in Db major to see how the pitches are renamed. Two notes that have the same pitch but are represented by different letter names and accidentals are described as enharmonic.
The circle of fifths can also be used to work out which keys are related to each other. You can see that the keys on either side of C are F and G. Therefore, the two closest keys to C, which has no sharps or flats, are F, which has one flat, and G, which has one sharp. F and G therefore make up the primary chords in C major. F is chord IV, the subdominant, and G is chord V, the dominant. Using these three chords you can build the standard chord progression IV V I.
The secondary chords are those further away from the note of your key, so in C major, D, A and E would be secondary chords, which means they may appear in the harmony of your piece but are not as strong as the primary chords.
Watch these two clips. They explain how the circle of fifths works in major and minor keys:
The circle of fifths is also useful for understanding chord progressions such as those from dominant seventh chords. Dominant seventh chords have a tendency to want to go towards another chord. They contain a dissonance that melodically and harmonically needs to resolve. The chord that the dominant seventh resolves to is one fifth lower, so A7 resolves to D major, F7 resolves to Bb major, and so on. If you are asked to play a dominant seventh in the key of D, you will start on the note A.
Here is another clip explaining how to use the circle of fifths to understand your scales.
The model of a circle of fifths, with the consequent understanding of chord progressions and harmony and the hierarchy and relationships between keys, has played a hugely important part in Western music.

Listening is one of the most important skills you can have. How well you listen has a major impact on your effectiveness at work, your relationships and your musical practice.
Listening enables you to learn, to obtain information, to understand and to enjoy, yet it can often feel like an abstract ability. Research suggests that most people remember only 25 to 50 percent of what they hear, meaning that whether you’re talking to a friend, listening to your violin teacher or listening to your violin practice, you’re paying attention to at most, half of what’s going on.
By becoming a better listener, paying attention to how you listen and what you are listening for, violin practice will improve, but good listening and its application in violin practice requires a high level of self-awareness, attention, positive attitude, flow concentration and critical thinking skills.
Listening in violin playing comes in many different guises:
First, prepare yourself to listen. Put other things out of your mind. If you notice you are thinking about what you’re going to have for dinner, allow the mind to re-focus on the music you are about to play, the sound you want to make and the shape of the musical phrase you would like to express. It is very easy to allow the brain to drift into autopilot.
Warm up by playing some long notes and slow scales. Really engage with the sound you are producing. Try to do so non-judgementally, just enjoying the variations of vibration and tone. As your body warms up, give yourself some images of colour, texture or objects, for example, a smooth piece of dark blue velvet. Visualise the feeling and the colour, and then play some notes with the same feeling. Really listen to your tone and the feelings you produce from the notes.
Practice focussed concentration. Break your violin practice into short bursts so you can really listen. The mental state in which you are fully immersed in what you are doing, known as flow or being in the zone, represents the deepest levels of performing and learning. In flow, the emotions are positive, energised and aligned with the task in hand. This level of positive focus is most likely to occur when you are practising with purpose; with a clear set of goals and progress, giving direction and structure to the practice, and with clear feedback; so having actually really listened to what you’ve just played.
It is important to find a balance between the perceived challenges of the music or technique you are practising, and your level of skill as you perceive it: You must feel confident in your ability to achieve what you want.
Broken down, this level of concentration can be achieved when you know:
If you are bored or anxious, it is very difficult to concentrate properly, and to listen to what you are really playing without negative preconceptions. Use visualisation, listen in your mind to what you want to do, listen to the results and enjoy the process. This is where your critical thinking skills will come in. Use the information gathered from listening fully to what you are doing to evaluate what you are doing and how you might develop it.
Full concentration, really listening to what you are doing, is more likely to produce the information and results you want than simply hearing what you’re playing.
Try breaking down what you hear into separate parts so you can listen more closely. Work on the rhythm, intonation, tone, phrasing and other musical ideas individually, and then start to put everything back together. Sometimes when you concentrate on the rhythm, the tuning will go funny, for example. Don’t worry about this; your brain is focussed on integrating your understanding of the rhythm. You can go back to the intonation later.
Allow your ears to listen to the sound in the whole room, not just to the sound coming from your violin. Imagine you have one ear at each side of the room. Sometimes it can be interesting to put an earplug in your left ear to hear the sound that is going into the space rather than the noise under your earhole!
Read the article about visualisation skills for more ideas and practice techniques.
You can use the ViolinSchool Auralia ear training software (included free with your ViolinSchool membership) to practice your listening skills and deepen your understanding of the music you are learning. Most music has three main ideas to notice: new melodies, repetition and variation. You can also look for colour, balance and texture, key (major or minor), rhythms and accompaniment. The more you understand about how your piece is put together, the easier it is to feel confident in how you want it to sound.
Listening to someone you admire playing the piece you are learning is one of the best ways to motivate yourself and understand the music. You can develop a mental map of the characters, colours and energies that make up your piece.
Listen to the piece as a whole and in small sections. It can be fun to listen to a phrase and then try to recreate the sounds and shapes you heard on the recording. Many beginner violin books and graded exam books now come with CDs. For children learning the Suzuki method, listening is one of the first skills learned. Suzuki encouraged his young students to listen to recordings of great violinists, and his method is based on the mother tongue ideal of repetition and imitation. Suzuki children normally start off playing the violin with a beautiful tone because they have listened so much to the sound of the violin. Ultimately, listening to the piece before and during study allows you to build a concept and an ideal of the music, and motivates your listening and your practice.
Recording your violin practice and performances and listening back is an extremely useful practice tool. Don’t listen back immediately if you feel it might be a negative experience. Record one day and listen back the next so you have a little distance from the process of “doing”. Often you will pick up on all sorts of things you missed. The violin is right under the ear and it can be difficult when you’re actually playing to pick up on things that are obvious when you are focussed solely on listening.
It can be easy to go into a lesson with a preconceived idea of what you can and cannot do. Your teacher will have a completely fresh perspective on what you are playing and will hear positive things and aspects you can work on, some of which you may think didn’t sound so good, or which you hadn’t noticed weren’t working. When your teacher is explaining something, don’t talk. Listen. Don’t interrupt or talk over them or you will miss vital information. You already know what you think; this is the time to take advice.
Listen to feedback in a positive way. Feedback that tells you why something isn’t working and how you can make it better is incredibly valuable; don’t let it depress you if your teacher isn’t constantly complimentary. Listen to the feedback and add it to your information banks. It would be much worse if nobody in your support network ever told you something didn’t work and it was only picked up in an important concert.
Playing with other people requires a whole new level of listening. Suddenly you aren’t just listening to your own sound, tuning and rhythm, you’re listening to the group sound and required to play in time and in tune with other people.
Have a look at the article about Ensemble Playing for some in depth ideas for playing with other musicians.
The whole point of playing the violin is to enjoy its sound. Without listening, there is no function to the music. Developing the conscious listening skills in practice that enable you to really express the music in performance is a really important part of practice and learning. Learning to listen when you practice, and to hear the elements of music as it’s performed, will heighten your enjoyment when you go to a concert, or when you hear birdsong, the wind in the chimney or the waves on the beach. You might even find you are listening and communicating better with others.
Start noticing your listening when you practice and see what else comes into your awareness through practising this essential skill.
One of the most crucial decisions to the performance and interpretation of any piece of music is the speed. Getting the speed right allows room for all the intricate levels of technique and expression to work; it creates the mood, tells the story and allows the music to dance.
When we play in an orchestra, the conductor indicates the speed of the piece with his upbeat and subsequent arm movements. In smaller ensembles, the speed of a piece must be decided between the musicians, and somebody has to lead. This is helped by everybody breathing together as the upbeat is given. In violin practice, we can use a metronome or our own sense of pulse, and choose a practice speed that allows us to work effectively.

The speed of a piece of music is called the tempo, which is just the Italian word for time. In fact, most of the words we need to learn in order to understand the speed and feel of the music we play are Italian. In the 17th century, when tempo indications were first used extensively, defined and standardised, many of the important composers were Italian, and these terms have remained widely used in music to the present day.
There tends to be no tempo indication in music written before this method came into common use. In Baroque music, conventions governing composition were so strong that the speed of the music is hardly ever indicated. When Bach wrote a Giga, it was understood what speed that Giga, or jig, was meant to go.
In Renaissance music, most pieces were understood to flow at a speed roughly the same as the human heart rate. The note value which corresponded to this pulse, known as the tactus, was defined by the time signature, so 3/4, 2/2 and 6/4 would indicate different speeds as much as a different musical emphasis.
Many musical forms, particularly those derived from dances, have their own tempo too, so no instruction is given in the music. When we see a waltz, minuet or tango, we understand the speed and mood from our knowledge of the dance, period and style.
The tempo of a piece of music is sometimes indicated by a metronome marking which is measured in beats per minute (BPM). The note value that gives the beat is specified by the time signature. For example in 4/4, the beat is a crotchet. The speed is dictated by the amount of time between beats, specified as a fraction of a minute. A metronome marking of crotchet = 60 means there is one crotchet beat per second, and a metronome marking of crotchet = 120 means there are two crotchet beats per second; so crotchet = 120 is twice as fast as crotchet = 60.

The metronome was invented by Johann Maelzel in 1816. Music written before the metronome became popular will only have metronome markings if they are editorial. One of the first composers to include these mathematical tempo indications himself was Beethoven, but his markings create more questions than answers; they are inconsistent or sometimes impractical, leading to the theory that his metronome didn’t work very well! The modern digital metronomes are much more reliable.
Despite appearing very specific, metronome markings are nearly always only an approximate guide. Depending on the time signature, your musical interpretation and even the acoustic where you are performing, the markings may not always be appropriate.

Most pieces of music are given Italian words as tempo indications. These words are much more specific in their descriptions of how a piece should go than a metronome mark, as they often give an indication not only of speed, but of the character and mood of the music. For example, whilst Presto means fast and Allegro also means fast, the Italian meaning of the word Allegro is joyous or gleeful, giving a new intention to the music.
Tempo markings are also frequently accompanied by descriptive words which give a deeper indication of how the music should sound.
The understanding and interpretation of tempo markings must be affected by when the music was written. Tempos have changed over the course of time, and some of the terms have switched places. A modern Largo is slower than an Adagio, but in Baroque music it was faster.
Let’s have a look at some of the most common words you will see:
Grave – slow and solemn
Lento – slow
Largo – slow and broad
Larghetto – quite slow and broad
Adagio – slow and stately, meaning “at ease” in Italian
Andante moderato – a bit slower than Andante
Andante – at a walking pace
Moderato – at a moderate tempo
Allegretto – moderately fast
Allegro – fast, quickly and bright
Vivace – lively and fast, from the Latin, vīvāx, literally meaning full of life
Presto – extremely fast (168–177 BPM)
As with dynamics, basic tempo markings can be adjusted in various ways:
Tempo can often fluctuate through a movement to give musical interest. Tempo changes are often written into the music, and there are specific terms for these too.
Composers often use expressive marks to adjust the tempo in the middle of a piece. Elgar is famous for his exacting instructions and some of his works have a different tempo marking every few bars!

Here’s what they all mean:
The overall tempo indication will always appear in large type above the stave, whereas tempo adjustments such as accelerandos or ritenutos generally appear below the stave.
After a change of speed, a composer may indicate the return to a previous tempo by marking a tempo or tempo primo. These terms indicate an immediate return to the main tempo of the piece.
Alongside the instructions which exist purely to give an idea of the speed, composers use a huge variety of descriptive words. The slow movement of Elgar’s String Quartet is given a metronome marking alongside which it is simply marked piacevole, which means peacefully. Given the context of Elgar’s music, this word conjures up bucolic interpretations of this peace and gives a clear idea of his intention for the mood. It would mean something different from another composer.
The number of words used to give the character sometimes precludes understanding without the aid of an Italian dictionary, but many of them are quite similar to English words. Here are a few examples of descriptions that often accompany tempo markings:
Although Italian is the most common language for tempo and expression markings, many composers write in their own language. Debussy, Ravel and Rameau wrote their instructions in French, and Beethoven, Mahler and Strauss used German.
Take time to learn as many tempo words as you can, and notice which other words regularly appear at the top of your music. Listen to the music you are learning, and to other music by the same composer or from the same period of musical history. Watch dancers performing modern and ancient dances and listen to folk music.
Tempo markings give a clear academic definition to the speed of a piece, but only practice, immersion in listening and experience will really help you to choose the speed which makes the music work best for you and your audience.

The violin is traditionally built as an acoustic instrument. The shape of the body is designed purely to produce and amplify the sound created by the vibrations of the strings. However, since the American jazz clubs of the 1920s, modern popular music genres have created the need for violins that can be amplified beyond the normal capabilities of the instrument.
There are various different ways to create an electronically amplified sound for the violin. Some musicians argue that the best tone is produced with an acoustic violin and a specialised microphone, but this can sometimes create feedback and amplify unwanted sounds, as noise from a loud room will resonate inside the body of the violin and pass back into the microphone.
Another way to amplify the violin is with an electric piezo pickup, which is a small transducer in contact with the body or bridge of the violin, designed to amplify only the sound created by the violin. A violin modified with a pickup is referred to as an electro-acoustic violin.
Electro-acoustic violins are often custom built, as most violinists are nervous of applying a contact pickup to the varnish or bridge of their best instrument. They can still be played as acoustic instruments, although the extra weight of the pickup can make them less comfortable to use, and the pickup itself on the body of the violin can mute the sound slightly by dampening the vibrations.
The first use of electronically amplified violins was in jazz music. The jazz violinist Stuff Smith (1909 -1967) who is featured in several trio numbers on Nat King Cole’s album After Midnight, is thought to have been the first violinist to experiment with adapting the violin with pickups. His better-known counterpart, Stephane Grappelli (1908 – 1997) apparently struggled to find a solution to the need for amplification.
There is a gap of fifteen years between 1956 and 1971 in Grappelli’s discography; a time when he barely recorded anything. This is thought to be due to the technical developments in jazz music at the time. Electric guitars, improved microphones and bigger brass sections made it hard for the violin to compete, and Grappelli was dissatisfied with the results of his experiments with amplification as they had a destructive effect on the unique, gentle timbres of the violin. He tried out lots of different things, one of which was an early electric violin.
In an interview with Max Jones of the London Melody Maker in November of 1952, Grappelli declares of the electric violin, "Now the Violin Can Find a Real Place in Jazz . . ." It possible he was either testing or endorsing the instrument as his enthusiasm is not followed up with any noted performances or recordings on the violin. The article continues:
"In his Variety act with pianist Yorke de Sousa, Grappelly [he often used this misspelling as it was preferable to the alternative mispronunciation] still uses his standard violin. But for dances and jazz sessions his improvisations are now amplified directly he puts bow to steel strings. He is an enthusiastic exponent of the electric violin - an American instrument that radio listeners heard for the first time in World of Jazz on November 1.
'Of course the instrument's full value cannot be realized from a record or broadcast, because the amplifier isn't really needed then. The tone sounds different, yes; but you must hear this violin in a hall to get the whole effect. It is wonderful.'
The wonder instrument is a curious sawn-off looking thing, visually unimpressive and extraordinarily heavy. We wanted to know if it demanded a special technique.
'The fingerboard is the same, but it has to have metal strings. For me, the finger- pressure is about the same as I normally use, but the bowing is different. This needs great control. You must have very steady bowing, for every little sound is enlarged through the loudspeaker. Each time I am going to use the electric fiddle I must get used to it again; I must play all day. It isn't easy to play well at first, but once you have mastered this fiddle it is fantastic. This fiddle is definitely better than the normal one for jazz playing; there is no comparison. For solos it is powerful and exciting. It means that the violin can take a full part in the jazz orchestra at last. It's no longer a little voice; it's more like four fiddles. I mean, I may play louder than four fiddles, but, of course, the sound is not the same. In fact, it is an entirely new sound, and eventually it will add new tone colour to jazz recordings, too.’”
Melody Maker November 15th 1952
The instrument Grappelli was talking about was made by the American company Vega, who were manufacturing electric violins from as early as 1939.

The American company, Fender, which is famous for its electric guitars, also produced some of the early electric violins, with the first model appearing in 1958.
As we can see from this interview with Grappelli, and from the Vega advert, even by 1939, the electric violin was a very heavily modified version of the violin.
The modern electric violin, most accurately described, is an instrument almost entirely distinct from the violin, with built-in pickups and a solid body.
The body of the electric violin is solid for three reasons:
The shape of the electric violin is modified to be as minimalistic as possible, to keep the weight of the body from becoming too great. Materials used to build the body include carbon fibre, Kevlar and glass, although performers increasingly customise and embellish their instruments, as demonstrated by these two Swarovski Crystal encrusted instruments belonging to electric violin duo Fuse. For more information please visit www.fuseofficial.com or www.electricstringquartet.com"

Fuse also commissioned two 24 carat gold plated violins, which are each insured for £1.35 million.

The electric violin is still seen as a somewhat experimental instrument. It is much less established than the electric guitar or bass, and produces very different results from the best acoustic violins. There are many variations on the standard design. Some instruments have frets, extra strings, guitar heads instead of violin pegs and sympathetic strings.
It is also not unusual for an electric violin to have five, six, seven or more strings. Dutch violinmaker Yuri Landman built a 12 string electric violin for the Belgian band DAAU. The strings on this instrument are clustered in four groups of three strings tuned unison creating a chorus.
The extra strings on these multiple-stringed violins are usually a low C string on a five-string, which gives an instrument which can serve simultaneously as a violin and viola, a low C and low F on a six-string, and a low C, F and B♭ for strings.
The amplification signals for the electric violin pass through electronic processing in the same way for the electric guitar. The audio output is transferred through an audio cable into an amp or PA. Most electric violinists use a standard guitar amp, which will be reliable but may not give the best tone for the violin. Few amps exist specifically for the electric violin. Effects pedals that create delay, reverb, chorus and distortion can be used to create variations on the traditional sound. Electric violins may use magnetic, piezoelectric, or electrodynamic pickups, the most common and inexpensive of which are the piezoelectric pickups. Piezo elements detect physical vibrations directly. They are placed in or on the body of the violin, or more commonly they take their output from the vibrations of the bridge. These pickups have a high output impedance, which means they must be plugged into a high impedance input stage in the amplifier, or go through a powered preamp. This matches the signal to avoid any problems with low frequency loss and microphone noise pickup.

There are increasing numbers of electric violins to choose from, and various companies that produce their own version of the instruments. They are ideal for pop and rock music. With the correct pedals and equipment they produce a huge range of sounds and effects, and they also create a modern image, which fits better than a traditional violin in certain settings. The sound is not as sophisticated as the acoustic violin, and levels of expression and nuance are more electronic than imitative of the human voice. However, the electric violin particularly gives the opportunity to experiment with multiple combinations of strings and instrumentation, which is not possible on an acoustic instrument. It is also great for silent practice.
For those purists who love the sound of the violin, the electric violin is a long way from replacing the violin’s sheer beauty of sound, but there is an increasing market for electric violin music, and several popular artists and groups have based their careers entirely around the versatilities of the instruments, as well as many musicians who have integrated the range of the electric violin into their repertoire. In fact, electric violin makers often work with violinists to produce newer and better solutions to the musician’s needs. Instruments can be really personalised.
The electric violin is still an instrument in the developmental stages, but the demands of musicians wanting the perfect combination of versatility and sound quality will continue to improve its status and desirability. It will never replace the violin, but the electric violin is gaining its own place in music.
“To rely on muscular habit, which so many of us do in technique, is indeed fatal. A little nervousness, a muscle bewildered and unable to direct itself, and where are you? For technique is truly a matter of the brain.” Fritz Kreizler, violinist and composer 1875 -1962
Visualisation, the process of creating compelling images in the mind, is one of the most valuable tools for learning and integrating skill, building confidence and achieving success, yet we constantly underuse it in our lives and our violin practice.
Visualisation accelerates the learning of any skill by activating the power of the subconscious mind, focussing the brain by programming the reticular activating system - the filter which mediates information and regulates brain states - to seek out and use available resources, and by raising the level of expectation, motivating a better result.
Scientists have found that the same regions of the brain are stimulated when we perform an action and when we visualise performing that action: If you vividly imagine placing your left hand fingers on the fingerboard of your violin, your brain activates in exactly the same way as if you were actually doing it – your brain sees no difference between visualising and doing. This research is used to great effect to help stroke patients reactivate muscles that have lost their facility: It has been found to be possible to build strength in a muscle that is too weak to move by simply repeatedly imagining the movement.

The process of visualisation, which was initially dismissed by many as unfounded, is described in W Timothy Gallwey’s 1974 book, The Inner Game of Tennis.
“There is a far more natural and effective process for learning and doing almost anything than most of us realize. It is similar to the process we all used, but soon forgot, as we learned to walk and talk. It uses the so-called unconscious mind more than the deliberate "self-conscious" mind, the spinal and midbrain areas of the nervous system more than the cerebral cortex. This process doesn't have to be learned; we already know it. All that is needed is to unlearn those habits which interfere with it and then to just let it happen.
Visualisation simply makes the brain achieve more. Sports psychologists and peak performance experts have been popularising the technique since the 1980s, and it has been integrated into almost all mainstream sports and performance coaching, success programmes and business training.
Athletes using guided imagery and mental rehearsal techniques can enhance their performance by creating mental images to intend the outcome of a race. With mental rehearsal the body and mind become trained to actively perform the skill imagined. Repeated use of visualisation builds experience and confidence under pressure, maximising both the efficiency of training and the effectiveness of practice. This principle applies to learning anything new. According to Jack Canfield, in his 2004 book, The Success Principles, Harvard University researchers found that students who visualised tasks before performing them, performed with nearly 100% accuracy, where those who didn’t use visualisation achieved only 55% accuracy. This is also true when applied to the process of learning the violin, both during practice time and performance.

“Fortune favours the prepared mind.” Louis Pasteur, chemist and microbiologist, 1822 - 1895
Most of us are familiar with the idea of reading ahead in the music, or of hearing a note or pitch before playing it. Visualisation - not only conceiving of a phrase before playing it, but vividly imagining the sound, how it feels, where the fingers will fall, how the hand will move in a certain shift and even how the performance will go - is a much deeper way of mentally absorbing and preparing the information. It is also one of the best ways to rid your practice of monotonous repetition and develop awareness of your musical actions.
It’s all very well knowing how great visualisation can be, but how do you go about it? What happens if you close your eyes and don’t seem to be able to see anything?
There are two different ways of visualising, depending on your brain type, both of which are absolutely legitimate. Some people are what psychologists refer to as eidetic visualisers. When they close their eyes they see things in bright, clear, three-dimensional, colour images. The majority of people, however, are noneidetic visualisers. This means they don’t really see an image as much as think it. THIS WORKS JUST AS WELL!
Before we look at how we can apply visualisation techniques in violin practice, let’s look at an example exercise from The Inner Game of Tennis, in which the aim is to hit a stationary target with a tennis ball:
“Place a tennis-ball can in the backhand corner of one of the service courts. Then figure out how you should swing your racket in order to hit the can. Think about how high to toss the ball, about the proper angle of your racket at impact, the proper weight flow, and so forth. Now aim at the can and attempt to hit it. If you miss, try again. If you hit it, try to repeat whatever you did so that you can hit it again. If you follow this procedure for a few minutes, you will experience what I mean by "trying hard" and making yourself serve. After you have absorbed this experience, move the can to the backhand corner of the other service court for the second half of the experiment. This time stand on the base line, breathe deeply a few times and relax. Look at the can. Then visualize the path of the ball from your racket to the can. See the ball hitting the can right on the label. If you like, shut your eyes and imagine yourself serving, and the ball hitting the can. Do this several times. If in your imagination the ball misses the can, that's all right; repeat the image a few times until the ball hits the target. Now, take no thought of how you should hit the ball. Don't try to hit the target. Ask your body, Self 2, to do whatever is necessary to hit the can, then let it do it. Exercise no control; correct for no imagined bad habits. Having programmed yourself with the desired flight of the ball, simply trust your body to do it. When you toss the ball up, focus your attention on its seams, then let the serve serve itself. The ball will either hit or miss the target. Notice exactly where it lands. You should free yourself from any emotional reaction to success or failure; simply know your goal and take objective interest in the results. Then serve again. If you have missed the can, don't be surprised and don't try to correct for your error. This is most important. Again focus your attention on the can; then let the serve serve itself. If you faithfully do not try to hit the can, and do not attempt to correct for your misses, but put full confidence in your body and its computer, you will soon see that the serve is correcting itself. You will experience that there really is a Self 2 who is acting and learning without being told what to do. Observe this process; observe your body making the changes necessary in order to come nearer and nearer to the can, Of course, Self 1 is very tricky and it is most difficult to keep him from interfering a little, but if you quiet him a bit, you will begin to see Self 2 at work, and you will be as amazed as I have been at what it can do, and how effortlessly.”
You can already see how this same exercise might be applied to practising a particular shift or bow stroke, any specific element of your piece that requires a certain physical movement to gain a result.
Here are some more practice and performance ideas from The Musician’s Way, A Guide to Practice, Performance and Wellness by Gerald Klickstein, 2009
Start using visualisation in your practice. You will find you achieve much better results and increased confidence, you can practice at antisocial hours of the day or night, you can save tired muscles, and you will develop a much deeper, intuitive understanding of the instrument and the music. Visualise, imagine and mentally prepare at least as much as you physically play. As you practice visualising it will become easier to integrate it at speed and under pressure.
Visualisation is counter-intuitive in a culture where we are taught to try, try, try again, but it is without doubt the single most powerful practice technique that most of us don’t use!
“If you cannot visualise what it is you wish to become, then the brain doesn’t have the first clue how to get you there." Chris Murray, Author of The Extremely Successful Salesman’s Club
How the Violin Makes Sound
The body of the violin is a hollow space that functions as an amplifier for vibration. The strings are suspended above the body by a bridge, a small piece of maple wood, which stands on the belly of the violin between the F holes and which is secured to the belly by the tension of the strings. The vibration from the stings is transferred through the bridge to the body of the instrument via the internal sound post. Vibrations are amplified as they meet the hard wood at the back of the instrument and come out through the soft front body and the F holes.
The F holes serve to connect the air on the inside of the instrument to the air outside. As a result of their length and shape, they allow the part of the belly between the holes to move more easily and to vibrate more freely than the other parts of the instrument.

The sound-post, the small upright piece of wood inside the violin, prevents the belly from collapsing under the tension of the strings and couples the vibrations between the stiffer back plate and the bridge. The position of the sound-post is critical to the sound of the instrument. The bass-bar sits inside the belly on the bass-foot side of the bridge, the side under the G-string or bass end of the instrument. This extends beyond the length of the F holes and transmits the motion of the bridge over a large area of the belly.
The air inside the instrument vibrates, exactly like the air in a bottle vibrates when you blow across the top of it.

The violin does not work like an electric amplifier. An electric amp takes a signal with a small amount of power and uses electricity to turn it into a more powerful signal. On the violin, the sound produced by the body of the instrument is created entirely with energy put into the string from the bow. The body of the violin is designed to make the conversion process of vibration to sound optimally efficient. A string on its own makes little sound.
Vibration of the violin strings can be achieved by plucking the strings, which is called pizzicato, or by drawing a bow across them, which is called arco. There are several other ways of making sound, known as extended techniques, which include col legno playing -hitting the string with the wood of the bow- or even tapping on the body of the instrument to make percussive noises.
The bow is strung with horsehair, normally about 150 to 200 hairs from a horse’s tail. Rosin, tree resin mixed with wax, is applied to the hair to increase friction. The surface of the hair shaft looks a little like the tiles on a roof, and the rosin adheres to the raised areas on the surface. Without rosin the hair is too smooth and will slide over the string with virtually no sound.

As the bow is drawn across the string, the air molecules in and around the violin move backwards and forwards, varying the air pressure by tiny amounts. The number of oscillations or vibrations of air pressure per second is called the frequency and is measured in cycles called Hertz (Hz). The pitch of a note is determined by the frequency, for example, 440 Hz, or 440 vibrations per second is the note A in the treble clef, the pitch of the A string. 220 Hz is exactly one octave lower, the A played with the first finger on the G-string.
The pitch of the vibrating string also depends on its thickness. A thicker string will sound lower than a thin one. The tension of the string also determines pitch: the higher the tension, the higher the note. Another differentiation is the length of the string that is free to vibrate. As fingers are added to the string on the fingerboard, the pitch of the note gets higher as the string is effectively shortened. Harmonics produce another mode of vibration, in which the sound waves produced by the string are a fraction of the length of those normally produced.
Here Mark Wood demonstrates the physics of sound on his seven string electric fiddle. This is an extreme example of how the pitch works across the instrument, but it is also clear that the resonance created with electrical signals is very different to that of an acoustic violin with all its nuances of shape.
Tone Production with the Bow
The three main points of violin technique that have an impact on the sound are the weight, speed and point of contact with the bow. The bow must always be drawn at a right angle to the bridge, in a straight line between bridge and fingerboard. Simon Fischer describes this constant point of contact like the needle of a record player in the groove of a vinyl record.
Once the bow technique is developed to allow the flexible, spring-like action in the right arm and bow, the three aspects of tone production and nuance can be explored.
Speed of Bow
The faster the bow stroke, the greater the energy that is transmitted to the violin. If bow pressure remains constant, a change in speed will produce an increase in volume. Decreasing the speed will mean the sound gets quieter. For a musical phrase that requires a constant dynamic, therefore, an equal bow speed should be maintained throughout. A frequent mistake is to use too much bow at the beginning of the stroke and run out towards the end.
Pressure
The pressure of the bow on the strings comes from the weight of the bow itself, the weight of the arm and hand, controlled muscular action, or a combination of the these factors. The bow is heaviest at the frog and therefore whenever an even dynamic is required the pressure must be stronger towards the point. The amount of pressure helps determine the volume of the sound, but the quality of pressure is also important. Too much pressure crushes the string and actually prevents it from vibrating, and can even result in a change of note if the string is pulled too hard. The weight of the hand and arm and the pressure from the muscles must be transferred with freedom of movement and without tension. For example, a rigid right shoulder detracts from the ability to properly use the weight of the arm to apply pressure to the string.
Watch this tutorial by Yehudi Menuhin in which he demonstrates a series of exercises for developing a fluent, flexible right hand:
Sounding Point
The third factor in tone production is the sounding point or point of contact. This is the point in relation to the bridge where the bow has contact with the strings. The optimal sounding point changes in relation to the varying speeds and pressures of the bow, and to the length and thickness of the string. On thinner strings the sounding point is nearer to the bridge than on thicker strings; in higher positions it is closer to the bridge than in lower positions.
Tartini Tones
A further acoustic phenomenon, which Giuseppe Tartini used in his compositions to great effect, also has an impact on tone production. When thirds or sixths are played on the violin, especially on the A and E strings, a third note sounds well below the pitch of the two written notes. These resultant tones, also known as Tartini tones, exist when any two notes are played simultaneously. The pitch of the third tone should be consonant with the double stop. By awareness of these tones, intonation and resonance reach a new level.
Here is Tartini’s Devil’s Trill Sonata. Listen the depth of tone in the double stops.
